The *Monster Hunter* series is renowned for its diverse weapon selection, and the Great Sword in *Monster Hunter Wilds* is a prime example of devastating power. This guide will equip you with the knowledge to master this behemoth of a weapon.
Recommended Videos: Best Ways To Use the Great Sword in Monster Hunter Wilds
The Great Sword, true to its name, is a heavy hitter. Its slow swing speed is offset by the immense damage dealt with a single, well-timed strike. Mastering its use, however, is key to unlocking its full potential. Future upgrades will further enhance its power and elemental capabilities.
All Great Sword Moves
| Command | Move | Description |
|---|---|---|
| Triangle/Y | Overhead Slash | A quick overhead attack, chainable into charged attacks. |
| Holding Triangle/Y | Charge/Charged Slash | A powerful slashing attack; damage increases with charge time. |
| Holding Triangle/Y + Circle/B | Tackle | A rising slash that can interrupt monster attacks. A perfectly timed release stuns the monster, allowing a follow-up Cross Slash (Triangle/Y). |
| Circle/B | Wide Slash | A wide-sweeping attack, chainable after a Tackle (Leaping Wide Slash) or Strong Charged Slash (Strong Wide Slash). |
| Triangle/Y + Circle/B | Rising Slash | An upward slash ideal for hitting a monster's high points. |
| Holding Triangle/Y + Circle/B | Offset Rising Slash | A charged rising slash that, when timed correctly with a monster's attack, stuns it, allowing a follow-up Cross Slash (Triangle/Y). |
| R2/RT | Guard | Blocks attacks using the Great Sword's blade. Guard direction is adjustable in Focus Mode. |
| R2/RT + Triangle/Y | Kick | A kick performed while guarding. |
| L2/LT + R1/RB | Focus Slash/Perforate | A sweeping attack particularly effective against wounded areas. Hitting a weak point or wound triggers multiple hits for massive damage. Releasing R1/RB early ends the attack. |
Mastering Great Sword Combos
Effective combo use is crucial for maximizing the Great Sword's damage output in *Monster Hunter Wilds*. Here are some key combos to learn:
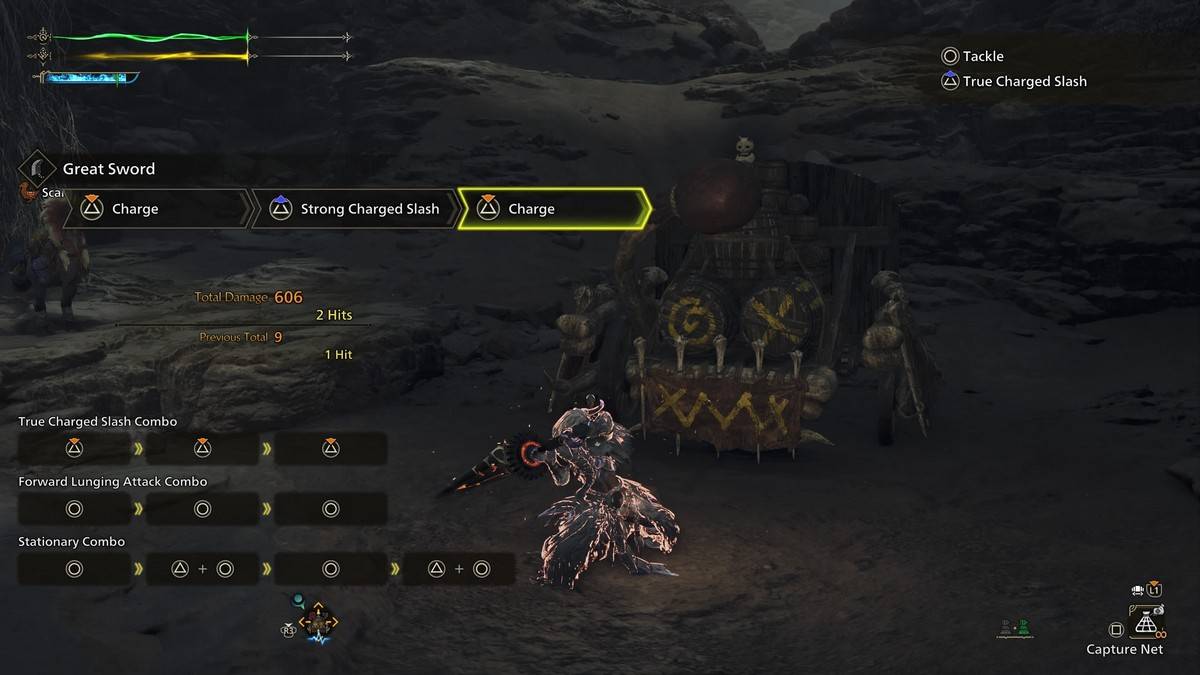
True Charged Slash Combo
This three-hit combo (Triangle/Y x3) starts with an Overhead Slash, followed by a Strong Charged Slash, and culminates in the devastating True Charged Slash. Charging each attack (holding Triangle/Y) increases damage. The hunter's color changes (white, yellow, red) indicate the charge level. Landing a True Charged Slash on a soft spot triggers the even more powerful True Charged Slash (Power). A shortcut involves dodging after the initial Overhead Slash to immediately perform a Strong Charged Slash via Tackle (Triangle/Y).
Forward Lunging Combo
This combo (Circle/B x3) consists of a Wide Slash, a Tackle, and a Leaping Wide Slash. Ideal for less predictable targets, its wide range and power make it highly effective. Combining it with Focus Mode ensures hitting weak points and wounds.
Stationary Combo
Best utilized against monsters affected by status effects like paralysis, this four-hit combo (Wide Slash and Rising Slash repeated twice) offers a quick, consistent attack pattern. While not the highest damage output, it maintains pressure on the target.
Defense and Counterattacks

Offset Rising Slash (Counter)
The Offset Rising Slash (hold Triangle/Y + Circle/B) is a powerful counter. Releasing the buttons precisely as a monster attacks stuns it, allowing a Cross Slash follow-up (Triangle/Y). Mastering the timing is crucial to avoid taking damage.
Guarding and Perfect Guard
Holding R2/RT activates a guard, mitigating damage but consuming stamina. A perfectly timed guard (at the moment of impact) results in a Perfect Guard, negating all damage. Sometimes, a Perfect Guard leads to a Power Clash, requiring rapid Circle/B button mashing to knock down the monster.
With this knowledge, you're well on your way to mastering the Great Sword in *Monster Hunter Wilds*. For more *Monster Hunter Wilds* guides, check out The Escapist.
Monster Hunter Wilds is available now on PlayStation, Xbox, and PC.


![Amy’s Ecstasy [v0.45 Final]](https://imgs.daqiang.cc/uploads/07/1719551527667e462789d0f.jpg)